In this guide I am going to show you how to easily enable the administrator account in windows 10.
Did you know by default the local administrator account is disabled and hidden in microsoft windows 10.
But dont worry as its very east to enable as I will shown below.

How To Enable Administrator Account Windows 10
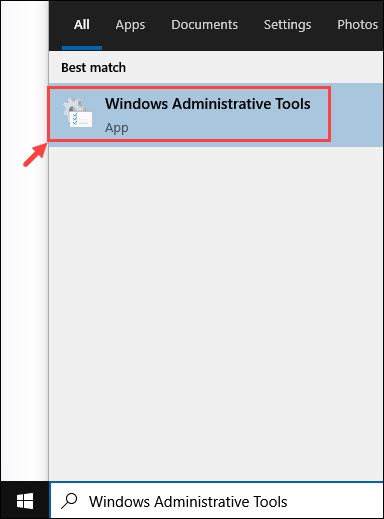
The easiest way to enable the administrator account is via the gui using the “Windows Administrative Tools” application in the start menu.
To be able to do this you will need to have the following things.
- A user account with local administrative rights
- Access to windows start menu (Can be disabled on some machines)
To enable the administrator account in windows 10 follow these steps
- Search for “Windows Administrative Tools” in the search box and click on its icon to open it.
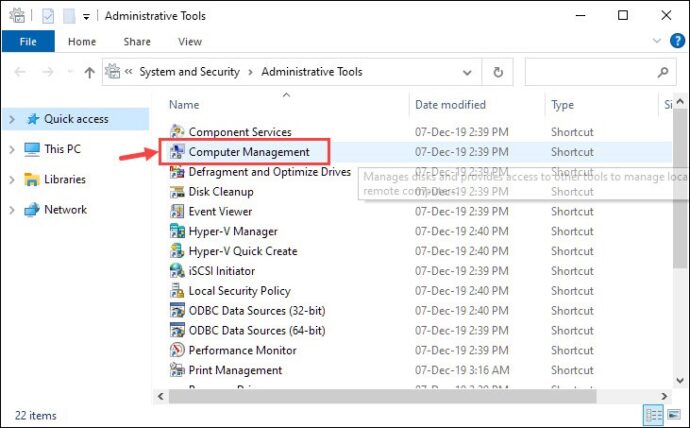
- Double-click on Computer Management to launch it.
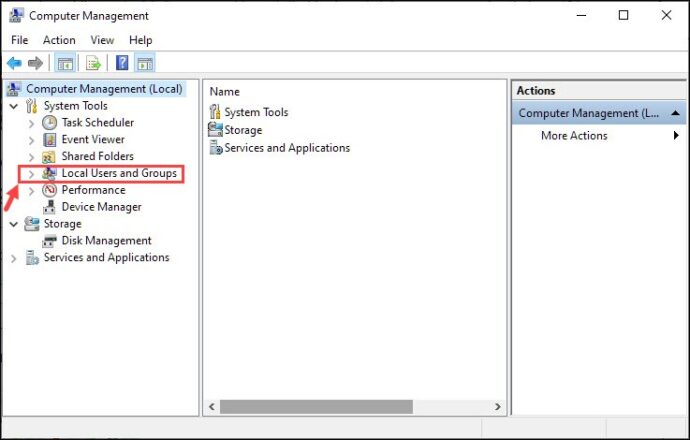
- Open Local Users and Groups
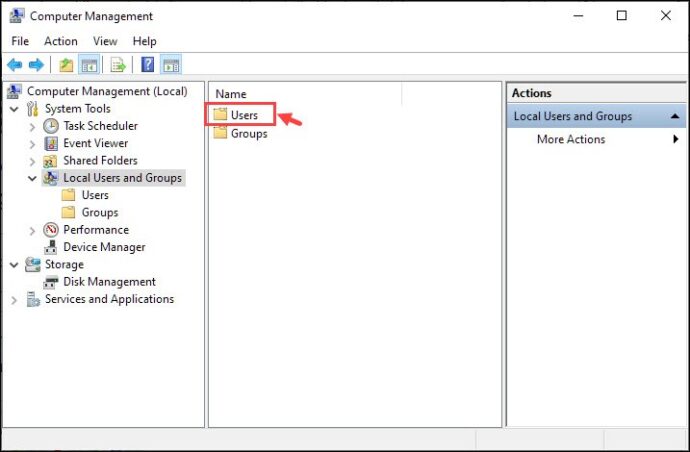
- Now open the Users folder by double-clicking it.
- Double click on the Administrator account and uncheck the “Account is disabled” option.
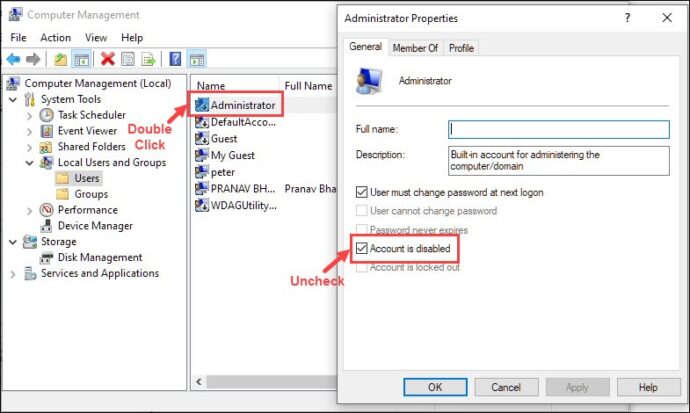
- Click Apply and OK.
- Right click on the Administrator user and select reset password
- Enter a password two times, hit ok
- Then close the Windows Administrative Tools.
- Click start menu and select log off
- Then log back in to the machine using the administrator login and the password you just set.


Enable Administrator Account With Command Prompt (CMD)
The quickest and most straightforward method to enable the admin account is by using the Command Prompt.
You can enable the administrator account by using the net user administrator /active:yes command. Here are the steps to do that.
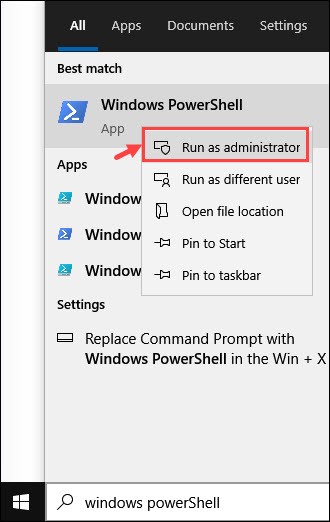
- Type Command Prompt on the Windows search box, right-click on its icon, and select Run as Administrator.

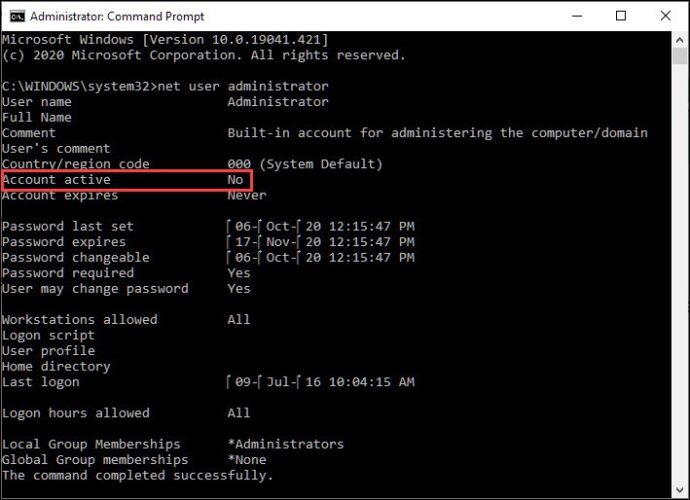
- Type the “net user administrator” command on the command window and hit enter. If Account active status is No, continue to the next step to enable it.
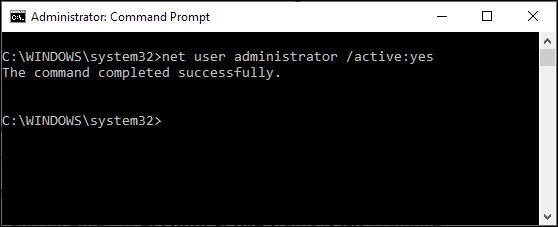
- Now you have to type the “net user administrator /active:yes” command and press the enter key. It would display the confirmation message of command completion.
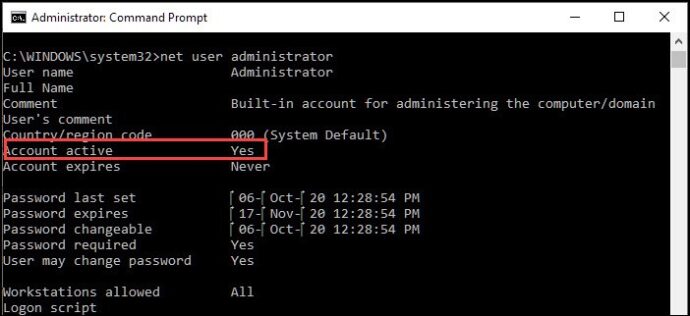
- Again, check the Account active status. It should now say


That is it. You have successfully enabled the administrator account on the Windows 10 system. Now, under your users’ list, you would notice the Administrator user is also added.

To access it, sign-out from the current user account and sign-in with the Administrator account.
If you don’t require the administrator account, you can disable it using the “net user “Administrator” /active:no”.
Enable Administrator Account With PowerShell
Windows PowerShell is a powerful tool for conducting various customizations. Here is how you can use it to enable the administrator account.
- In the Microsoft Windows search bar, search for the Windows PowerShell, right-click on its icon, and select “Run as Administrator.“
- On the command line, type or copy & paste the following command and hit enter to enable administrator account: Get-LocalUser -Name “Administrator” | Enable-LocalUser
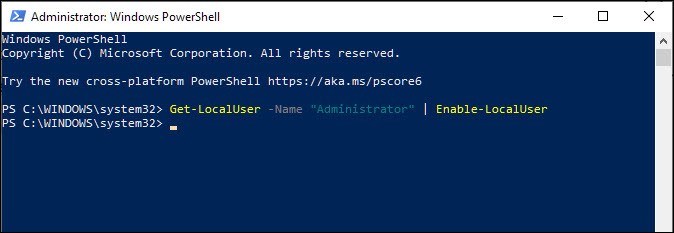
- The command would enable the admin account.


You can access the administrator account by logging-out from the current and log-in using the Administrator user.
After the requirement of the administrator account is fulfilled, you can disable it again using PowerShell. Use this command for that: Get-LocalUser -Name “Administrator” | Disable-LocalUser.
Enable Administrator Account using Group Policy Editor
Group policy editor is another powerful tool for accessing the advanced options of Windows 10. Follow these steps to use it for enabling the hidden administrative account in Windows 10.
- Press Windows key+R to open the Run Command box. Type msc and hit the enter key to open the Group Policy Editor.
- Now, navigate to this path: Computer Configuration -> Windows Settings -> Security Settings -> Local Policies -> Security Options
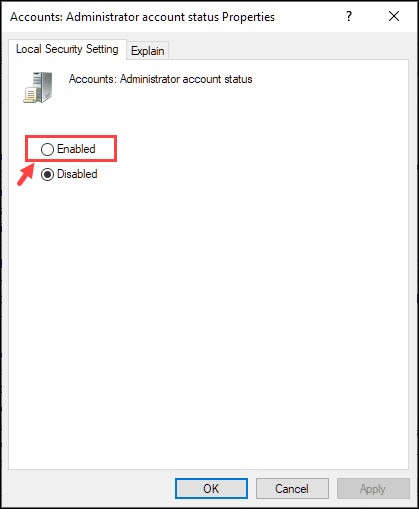
- Open the “Accounts: Administrator account status” option.

- Mark the Enabled option to enable the Administrator Account.


That’s it. Now you can access the Administrator account by signing in with it. After its requirements are completed, you can again disable it by following the same steps.
Frequently Asked Questions
Open the command prompt as an administrator. To do this click start, type in “Command Prompt”, then right click and select “Run As Administrator” then in the CMD window type in “net user administrator /active:yes” and hit enter
The built-in administrator account disabled for security reasons. The built-in administrator account has full administrative privileges and can make system-wide changes, which makes it a potential target for malicious activities if left enabled.
Type “lusrmgr.msc” (without quotes) and press Enter, In the left pane, navigate to “Users” and locate your locked administrator account in the right pane. Right-click on the locked account and select “Properties.” Uncheck the “Account is locked out” option if it is selected. Click “OK” to save the changes.

Hello, I am the owner of this site. I have 25+ years experience of IT. Check us out on the below social platforms.