By default Adobe Reader DC is set to automatically download and install any updates that are released by adobe. In this article I will show you how to disable auto updates on adobe reader dc.
Jump To
Disable Within The Application
Disable Within The Registry
Disable Adobe Update Service
How To Disable Auto Update on Adobe Reader DC
There are many ways you can disable Adobe Reader DC updates, I will show you all the ways below.
Disable Within The Application
To disable updates within the application do the following
- Open adobe reader dc
- Go to Edit > Preferences (Windows) or Acrobat /Adobe Reader > Preferences
- In the left pane, select Updater
- You now have four options
Automatically install updates : The application will automatically check for downloads and automatically install if any are found
Automatically download updates, but let me choose when to install them: The application will automatically download updates and will prompt you to install them
Notify me, but let me choose when to download and install updates: The application will notify you when an update is available.
Do not download or install updates automatically: Never check or download updates
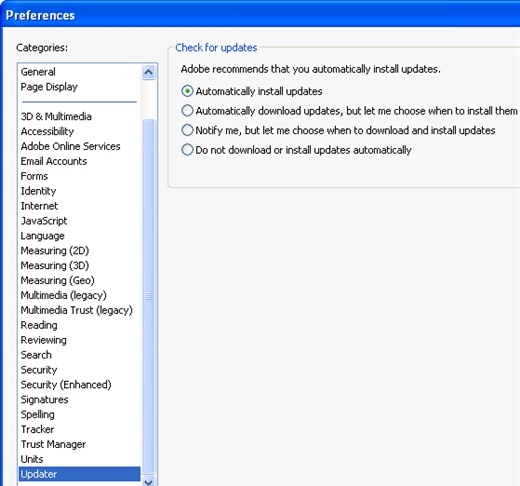
- Select the last option Do not download or install updates automatically
- Click ok to close the preferences window

If you have any questions about this process please leave us a comment below
Disable Within The Registry
You can set a registry entry which will disable updates. This can be very handy if you wish to apply this setting to many machines via group policy / logon scripts. To apply via the registry do the following.
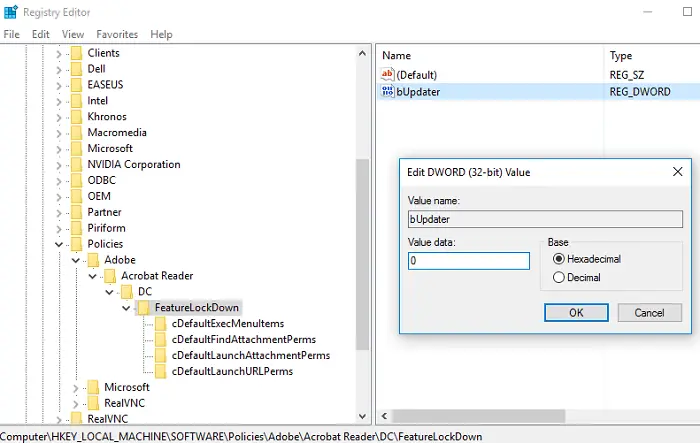
- Make sure adobe reader dc application is closed
- Click start type in regedit and launch the regedit aplication
- Browse to [HKEY_LOCAL_MACHINE\SOFTWARE\Policies\Adobe\Acrobat Reader\DC\FeatureLockDown]
- Right click > New > dword 32bit
- name it bUpdater
- set base as hexadecimal and value data set to 0 (the number zero) as below
- close down regedit

If you have any questions about this process please leave us a comment below
Disable Via Windows Task Scheduler
Sometimes when you disable auto updates via the app or registry the setting can change back to auto update (If you reset / recreate your windows profile or log on to the machine with a different logon)
By disabling the windows task scheduler the automatic check for updates will not work. To disable do the following
- Click on start and type in task scheduler and launch the application

- Right click on Adobe Acrobat Update Task at select Disable.


If you have any questions about this process please leave us a comment below
Disable Adobe Update Service
The last thing we need to do is disable the adobe update service, To do this
- Click start, type in services.msc and select the application
- Scroll down to “Adobe Acrobat Update Service” and double click on the service
- Under startup type select disabled
- Restart your machine

That is all the steps completed. If you have any questions about this process please leave us a comment below. Please also let me know if this article has helped you. Thanks

Hello, I am the owner of this site. I have 25+ years experience of IT. Check us out on the below social platforms.
Many thanks for this. Sadly option 1 (Disable Within The Application) is no longer available (as of version 2019.021 at least).
this is so outdated or wrong none of this information is relevant
The first option worked just fine for me. Many thanks.
I agree that having a date on this post would have been useful. The Updater option is no longer available in Edit / Preferences for the Win10 version.
What if There isn’t an option for updater in the left pane?
Please add this as another request for what to do when there is no “Updater” option (Win 10). How do we disable the updates now?